#objective c tutorials
Explore tagged Tumblr posts
Visit Tumblr Blog
Explore Tumblr blogs with no restrictions, modern design and the best experience.
Last Seen Tumblr Blogs


Fun Fact
Mobile Tumblr US users spend an average of 4.04 minutes per session on the app.
Text
just saw a pinterest comment that suggested learning how to crochet instead of learning how to knit because it's easier and i can't keep silent anymore i have to confess that i wrote my cass learns how to knit fic because i need people to love knitting in the same way that i need people to love cass. the crochet vs knitting metaphor argument exists because i've had that conversation (minus the metaphor and also it was jokingly silly with my friends) with me arguing the side of knitting and as much as i love projecting onto characters stephanie brown would never in her life be against crochet. she would adore crochet. i don't actually dislike crochet its good for things that knitting will never be able to do like baskets and is so much better for stuffed animals and i think it's better for things like bralettes and bags but knitting is so good for clothing it's stretchy and more flowy. crochet is so good for items that need to hold a little more structure but in my opinion knitting makes more comfortable clothing and crochet got so popular in the last couple of years but knitting did not and knitting is not more difficult!! knitting is fun and good and i love her!!!
#crochet got so popular in my generation in the past few years and left knitting in the dust. knitting is my most underrated fav#you would loooveeee knitting if you learned i promise it's not difficult i promise i promise#i mean maybe it is a little bit difficult because that's how hobbies work but you would loveeeeeeee knitting if you learned i promise#ive seen a couple of comments on tutorials and things that are like i know how to crochet but actually i think knitting looks better#and tutorial for crochet stitch that looks like knitting!!#and i'm over here foaming at the mouth#i know my dc friends will understand because its the same feeling as watching your underrated fav continue to be underrated#and objectively there's nothing wrong with this more popular character and you might even really like that more popular character#but if someone mentions they love that character because of traits that your underrated fav has then your eye will start twitching#like cass wants to kill herself so bad there should be buckets of venty angst h/c fic written by teenagers about her you know what i mean
31 notes
·
View notes
Text
Caffeine, chemistry and Caleb I
(Law student POV pt. 1)
Synopsis: The café was supposed to be just another coffee shop. For a law student who enjoys her morning coffee and a shy newbie still learning the ropes, it should have been nothing more than part of the daily routine… But then there’s Caleb.
Details: 1500ish words of my barista Caleb AU doodle that’s been sitting in the drafts forever. @drowsyapple asked so nicely for a continuation, so here it is—with added law student chaos. Non MC! Reader law student. Expect flirting, hot af barista Caleb, and banter with the barista newbie. You’re in this caffeine-fueled mess together.
Parts: part 2 (law student), part 3, part 4, part 5, part 6, part 7, part 8, part 9, part 10, part 11, part 12
Objection | Pt. 1 (pilot, law student)

You’re back.
You could lie. Say it’s because the café is closest to your lecture hall. Say the lighting is good for studying. Say the coffee is better here.
You could say any of those things.
But none of them would explain the lip gloss.
Caleb’s already behind the counter, sleeves rolled, forearms on full display like a public health hazard. He’s laughing at something the newbie said, head tilted back, grin sharp and lazy. The newbie glances up and sees you first. Their eyes narrow, just a little.
You give them a smile—the kind you usually save for opposing counsel in mock trials.
They give you one right back. Touché.
Caleb turns then, and his gaze lands on you like it always does—too direct, too calm, like it’s normal to make eye contact with someone and feel it somewhere under your ribs.
“Morning,” he says, all slow warmth and low charm. He leans his weight onto one hip, arms crossed—forearms flexed just slightly—and smiles like he knows he’s pretty.
Which, okay. Maybe he does.
Then: “Golden Girl, right?”
Golden.
Girl.
You open your mouth to correct him. You really do. But he’s already moving, scribbling it onto the cup in his quick, looping scrawl. And the thing is?
You kind of like it.
“Same drink?” he asks, glancing up through his lashes.
You nod. Mutely. Like an idiot.
The newbie is watching the whole thing with barely concealed amusement. You think they might be filing this under Exhibit A: How to Watch a Law Student Mentally Detonate Over a Latte.
Caleb makes your drink himself this time. No tutorials today. Just him, hands confident and sure, moving with that unbothered rhythm that makes everything look effortless. It should not be that compelling to watch someone tamp espresso. And yet.
He does that thing where he wipes his hands on a towel, then tucks it into the waistband of his apron.
You remember reading a case last semester where someone was arrested for intent to cause a disturbance. You’re starting to think that could apply here.
The cup hits the counter with a soft thud. He slides it toward you, fingers brushing the lid, like he’s tucking it in for a nap.
“Here you go,” he says. “Try not to fall in love.”
Your heart trips over itself.
You laugh, but it’s too breathy, too real. “You always this confident?”
He shrugs, smile tilting. “I just know my coffee’s good.”
You take the drink. Your hand brushes his. Barely. Enough.
“Thanks,” you say, trying to sound unaffected. Cool. Collected. The kind of girl who doesn’t lie awake wondering what a man’s voice would sound like against her throat.
As you turn to go, the newbie calls after you.
“See you later, Golden Girl.”
Their tone is knowing. Teasing.
And you don’t correct them either.
——————————————————————————
You’re surrounded by casebooks. Real law, real deadlines, real reasons to not be obsessing over a barista with a smile like a summer storm. You’re supposed to be outlining tort reform, but instead, you’re drafting legal arguments in your head.
Argument A: Caleb probably flirts with everyone.
Argument B: You’re not actually interested. You’re just… amused. Fascinated. Lightly affected.
Argument C: You are in control.
You write the words Golden Girl in the margin of your notes and immediately scratch them out like a crime scene.
By the time your second highlighter dries out and your coffee goes cold, you’ve convinced yourself the obsession is manageable. Contained. You just need one more look. A reminder that it’s not that deep.
So, naturally, you go back.
——————————————————————————
Caleb’s not there.
No crooked grin. No rolled sleeves. No towel tucked at his waist like a weapon. Just soft lighting and the newbie behind the counter, trying to act like they haven’t just caught you scanning the entire café in 0.6 seconds.
“You just missed him,” they say, not even trying to hide the smile.
You try not to look disappointed. Fail. “Damn. Thought maybe I’d… grab another coffee.”
“You just got one this morning.”
“And you remembered that?” You raise an eyebrow.
They shrug. “I’m observant. It’s a survival tactic around him. I’m making you tea.”
That earns a smile. You step up, lean on the counter, and grab a glass of water from the little tap tower like you own the place. “Okay. Spill. What’s his deal?”
The newbie flushes. “He’s… nice.”
You wait.
They sigh. “And smart. Studying aviation.”
That catches you off guard. “Wait, really?”
“Yeah. Like, actual planes. Cockpit stuff. Not just ‘I like clouds.’”
You process that for a beat. Aviation. Of course. The steady hands. The calm under pressure. The low, precise way he talks. The whole I will literally rise above you all energy.
Disgusting.
“Figures,” you mutter. “Bet he flies with that same stupid smirk.”
The newbie chuckles. “Probably. And you’re not the only one with that theory, by the way.”
You shoot them a look.
They hold up their hands, sheepish. “I’m just saying… he’s the kind of guy who flirts without knowing he’s doing it. Or maybe he does know. But doesn’t care.”
“I can’t afford to spiral,” you say flatly. “I’m going to be a lawyer. I don’t have time for emotionally unavailable air pilots with coffee-scented wrists.”
The newbie raises an eyebrow. “…That’s oddly specific.”
They nudge the takeaway cup toward you with a slightly awkward motion—like they’re not used to the gesture yet. You accept it with steady hands, calm as ever, like this is just part of the ritual now.
“Just a hypothesis,” you say coolly, then pause. “Okay, maybe it’s a well-supported thesis. But I’m distinguishing the case.”
“The what?”
“In law, it means the precedent doesn’t apply. So yes, he’s hot. Yes, I am apparently immune to better judgment. But I’m not going to be that girl who tanks her grades over a guy who’s literally training to fly away.”
The newbie grins. “Bold of you to assume you’re not already that girl.”
You sip your drink, feeling mildly attacked.
“…Objection,” you say.
They nod. “Sustained.”
You roll your eyes but can’t help the smile. For a moment, the café feels warmer than usual—less like a trap, more like a study break. Maybe this was worth it. Even without Caleb.
You glance down at your cup. Not your usual—green tea this time. A quiet suggestion you didn’t argue with. It’s gone lukewarm while you were busy running legal arguments about a barista through your head.
“I should go,” you murmur, adjusting your bag. “Actual law to study. Not just the hot-barista kind.”
The newbie nods, wiping down the counter. “Good luck distinguishing the case.”
“Thanks. I’ll win on appeal.”
You laugh under your breath and push open the door—right as someone else pulls it from the other side.
You don’t see him until it’s too late.
There’s a tangle of motion, a sharp inhale, and then your green tea jolts sideways—right out of your hand—and then, somehow… doesn’t fall.
Because Caleb is right there.
He moves like a reflex—fast, clean, and absurdly smooth—one hand catching the cup mid-air, the other steadying your wrist. And just like that, the tea is back in your hands, lid intact, barely a drop spilled.
He grins. “Whoa. Careful, Golden Girl.”
Your heart is gone. It left your body. You’re not even mad about it.
“Are you—” Your voice catches. “Are you training to be a pilot or a superhero?”
He shrugs. “I’m well trained.” A pause. His grin deepens. “So… how’d you know I was studying aviation?”
You freeze.
He caught that.
You flick a quick glance toward the newbie behind the counter.
They are suddenly very busy. Wiping down the espresso machine like it holds state secrets. Not looking at you. Not acknowledging anything.
“Lucky guess,” you lie.
His eyes stay on you for a moment too long, like he’s filing that answer away. He lets go, but the contact clings, like your body hasn’t caught up
“Well,” he says, stepping aside to let you pass, “Guess I’ll have to be more careful what I say around lucky girls.”
But this time, you don’t just stand there.
You look him right in the eye, a smile tugging at your lips.
“Maybe you should just be careful around me.”
That gets him.
For a second, something flashes across his face—amused, intrigued, the tiniest bit caught off guard. But then he recovers, of course he does, smile curling wider like you just played your first real move on the board.
He leans in just a little, voice low.
“Oh, don’t worry,” he murmurs. “I’m always careful. Especially with turbulence.”
And then—the audacity—he winks, pivots, and walks away, disappearing behind the counter like he didn’t just drop a full-body shiver down your spine.
You’re left standing in the doorway, blinking, your tea miraculously upright and your sanity… less so.
——————————————————————————
Part 2
——————————————————————————
Writer’s note: I said I’d post old drafts. You thought I was joking. That’s on you. Yeah sooo… I kinda love writing the law student. It’s lowkey personal (mystery author strikes again), so I won’t overshare. The obsession element is very fun to play with. Okey then, thank you for reading 🫶🏻
#so this has been marinating in my drafts for far too long but I hope you like it! oke time for a hike#love and deepspace#caleb love and deepspace#lnds caleb#lads caleb#caleb#you x caleb#non mc x caleb#fanfic love and deepspace#fanfic caleb#reader x caleb#fanfiction caleb
165 notes
·
View notes
Text
🫧✧ Baldur’s Gate 3: Gale’s Tower Set + Video Tutorial ✧🫧
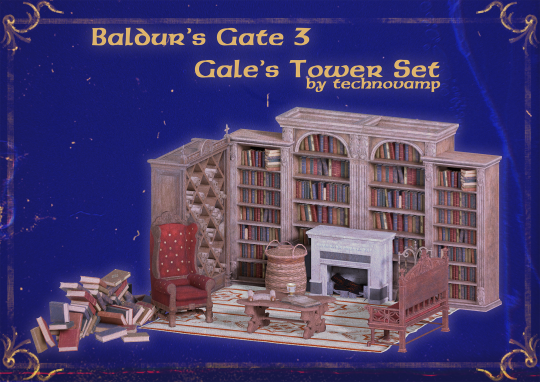
Hey everyone! I finally finished Gale’s Tower room. I loved working on it, and it was the most challenging set I have worked on so far. I am so glad you can finally have it! 💜
I also made a mini tutorial + showcase video, please watch it to avoid any issues in Build Mode.
youtube


Some objects in Gale’s room were already part of my other sets. If you have all my CC, then you should not miss anything. If you don’t have all of them, you can find missing pieces from my other conversions.
Statue and red bench next to the fireplace can be found here. Candlestick and rug close to the fireplace can be found here. Small paper pile can be found here.
I explained everything in the video guide, but you need the “bb.moveobjects on” cheat to build his room as close to the original as possible.
In Build Mode:
Press CTRL+Shift+C to bring up the cheat console
Type "testingcheats true" to enable cheats.
Type "bb. moveobjects on".
Or you can use the script mode. Here is the Always MOO (Forces MoveObjects On) mod by TwistedMexi, which I mentioned in the video.
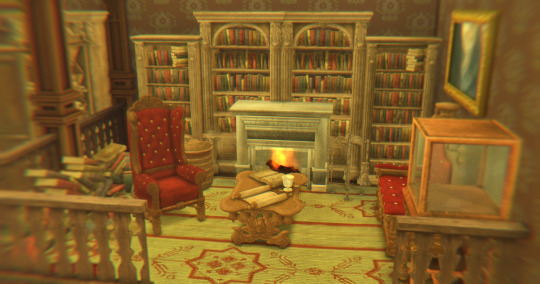
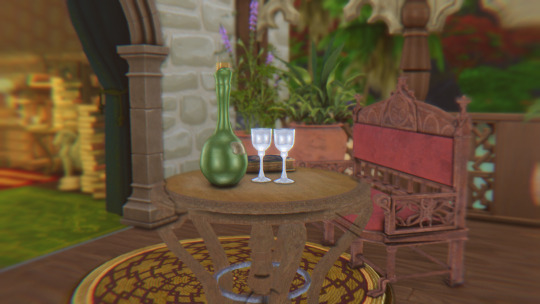
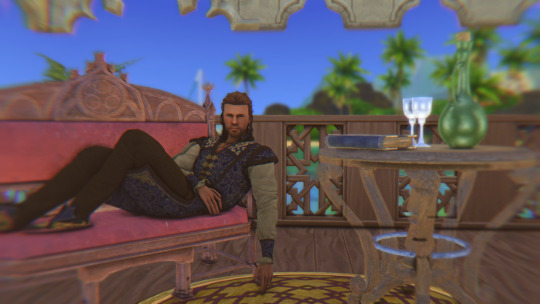
Beautiful screenshots from Gale’s romance scene can be used as a reference.
1. by rolanpilled 2. by sozosnipes


🫧✧Description:✧🫧
⭐️Baldur’s Gate 3: Gale’s Tower Set
⭐️Base Game compatible
⭐️63 piece
⭐️Custom thumbnail
🫧Download🫧

Please let me know if you have any problems.
#sims 4#cc finds#ts4#ts4 download#sims#the sims 4#simblr#ts4 cc#sims 4 cc#cc#bg3#baldurs gate 3#baldurs gate#gale dekarios#gale of waterdeep#bg3 gale#galemance#sims 4 maxis match#maxis match#maxismatch#ts4cc maxis match#sims 4 maxis cc#ts4cc#ccfinds#my cc#ts4 cc download#ts4 cc free#sims 4 patreon#gale#professor dekarios
215 notes
·
View notes
Note
hi nic!! do u have a tutorial on making gif packs?? i've been trying to look for tutorials and i think i just overwhelmed myself so i dont know where to start :((
omg hi!! i know a tutorial for this method exists, but i cannot seem to find it 😭 i'll go ahead & make one for you ! beneath the cut, you'll find my gifmaking process + all my favorite gif resources. i think something good to note is that every gifmaker i know does it a little differently, so you may prefer other methods like screencap clipping or video-to-layers. i think these tutorials by pochunts would be super helpful if you wanted to explore other options <3 here's the gif i made in the tutorial btw :p

how to make gifs using photoshop's video timeline (+ extra resources):
(if you want to follow along directly, i'm using this video.)
1) download your video. i use this website (cobalt). for the cleanest final product, try to use videos that are 1080p or higher.
side note: if you're downloading something other than mp4 files, you'll need a file converter- i use handbrake for this. this tends to come up if you're downloading tv shows!!
2) open your video in photoshop. (not import, just regular file > open)
this is what mine looks like now. our layouts may look a little different because mine is tuned to my job too.
if you're new to photoshop, go ahead & pinpoint a few things: your toolbar (yellow), actions panel (pink), adjustments panel (green), layers panel (blue), and video timeline (red). if you don't see these panels, go to window in your topbar & click the names.

general photoshop tip... go to photoshop > settings > preferences and 'up' your number of history stats. this will give you more 'undos' if you mess up rather than hitting a wall :p i have mine set to 75!!

3) convert to smart object. with your base layer protected, right click > convert to smart object, or go to layer > smart objects > convert to smart object. this basically allows you to make changes while keeping the base properties in tact!! you'll notice your timeline change from blue to purple.
bc i use this so often, i made the shortcut cmd+f. you can do the same by going to edit > keyboard shortcuts if you'd like :p


let's focus on that timeline for a moment... get familiar with the split button (red), zoom buttons (yellow), work area (green).
the split button is how we'll divide the video into clips, which will become our gifs. the length of your clip will vary. i just try to fit a completed action into one clip if that makes sense!!
the zoom buttons allow you to move through the video a little easier. this will end up being a personal preference thing. i usually zoom until frames are broken up by 2's (02:00f / 04:00f / etc - shown 2 pics down) but it also depends on the length of the video
the work area defines what will export when you hit save. later on, you'll want to make sure your adjustment layers cover the entire work area.

4) clip your video. skim through your video and pick a scene you'd like to gif. split at the beginning and end by clicking the scissors, so you have something like this. i'll pick three clips for the tutorial.
as a general note, i will clip the entire video in one go, save as a psd, then move onto sizing/coloring/sharpening/etc

go ahead & delete the layers you won't be using as clips. i would rec saving as a psd at this point to save urself the grief of any photoshop crashes since u have now clipped a video to your heart's content!!

5) now, onto sizing your gifs.
first you'll use the crop tool (pink, toolbar). you can input your desired size to keep the scene in ratio (in the pink squared boxes). this is up to personal preference again, i use 260x150.
once you choose a size, you can click the menu the green arrow is pointing to, scroll down, and define a new crop preset.

adjust image size. go to image > image size and type the size you decided. make sure it's set to pixels and that you have the in-ratio button (pink) clicked.

6) next, sharpen your gif.
as you're just starting out, i would suggesting using an action. i have my favorite options in this tag! to keep us on the same pace for this tutorial, i'll use this one by svgarboo.
using an action: click into your actions panel (red), click the options button (yellow) and choose 'load action', use the arrow (green circle) to open your action's folder and choose the playable option (green box). with your layer selected, click the play button (pink).
NOTE: if your play bar isn't over your active layer it won't apply
your video should look a little better & your layer should now look like this over in the layers panel:

if you want to make adjustments, double click the options buttons (pink) and adjust opacity to your liking.
7) coloring your gif. i could not begin to make a coloring tutorial bc i hate how mine turn out 90% of the time </3 BUT there are some beautiful tutorials in here ... I WILL SHOW U HOW TO PLACE THE LAYERS STILL !!!
add a new group (pink) & drag it above video group 1. it will float above your clips on the timeline. this is where your adjustment layers will go! i'm including a screenshot of my adjustment layers so you have an idea.


8) exporting your base gifs. adjust your working area bars to the beginning and end of each clip. go to file > export > save for web. i'll attach a screenshot of my export settings.

WHEN MAKING ADDITIONAL GIFS, REPEAT STEPS 5-8 AS NEEDED. because you used smart objects, you can use ctrl+t/cmd+t on your gif layers to resize instead of cropping each time.
9) adjusting gif speed. open your exported base gifs. you'll see that your video timeline has changed to a frames timeline.
go to options (pink) > select all frames. with all frames selected, click the dropdown arrow (yellow) and adjust your time.
timing will depend on a case-by-case basis. i usually go 0.05, 0.07, or 0.09. play around with speeds until the motion seems fluid and natural. my gif is around 110 frames long so i'm doing 0.05.
10) export again, using the same settings as step 8.
YOU CAN SET UP ACTIONS TO HANDLE STEPS 9 & 10 IN BATCHES. lmk if u would want a tutorial on that :p
now i have 3 finished gifs!!


11) uploading your gif packs. i think hosting directly on tumblr is going to give you the best loading time. and by that i do mean, just uploading gifs to a tumblr page 🙂↕️ if you choose to use alternate hosting sites like imgbb or gifyu, make sure you back your gifs up with a zip file on google drive.
81 notes
·
View notes
Text


Roads Redesigned
One of the small things that has always bugged me with The Sims 1 is the default, jet black roads used on lots that do not match the grey roads seen in the neighborhood view.
So I've created a new, more accurate, grey asphalt road texture.
I have also created new, more accurate road markings.
However - rather than making road markings that are baked into a floor tile, I have instead made them decals that can be applied over any floor tile! This opens up more flexibility when it comes to placing markings, finding other uses (like parking lots), and using different road textures underneath (if you so choose).
Pack Includes:
1 Default Asphalt Road Floor Texture (Build Mode > Floor)
4 Road Marking Decals (Buy Mode > Decorative/Miscellaneous/Street) - A double yellow Center Line - A narrow white Shoulder Line - A medium white Crosswalk Line - A wide off-center Stop Line [Optional]
Community Lot Stop Sign for Residential Lots (Buy Mode > Decorative) [Optional]
Just enable the "move_objects on" cheat, replace the default road with your new road texture, and start placing those decals.
I was going to provide a tutorial on how best to place stuff to be most accurate to the neighborhood view - and I still can if people want that - but honestly, just play around with it! You'll find what works best for you.
Very Important:
Be VERY careful when DELETING ANYTHING while you have the "move_objects on" cheat enabled - ESPECIALLY around roads & sidewalks.
There are hidden objects that are essential to the game - spawn points for sims/vehicles etc. If you need to delete a decal, make sure you definitely have the decal selected before hitting delete. Hidden objects will look something like this...

I would suggest making a backup of your lots before editing the roads, just in case you accidentally delete a hidden object without noticing. Just work slowly and carefully.
Stop Line / Stop Sign


I have provided optional files for a Stop Line and a Stop Sign for use on residential lots.
Stop Lines were only seen on roads in the smaller, pre-Unleased version of the neighborhood. They aren't seen in the large Old Town version of the neighborhood or Downtown. So whether you want to include them is up to you.
If you choose to include Stop Lines - it makes sense to have a Stop Sign to go with them. By default they are only accessible in Buy Mode on community lots - so the optional file enables them in Buy Mode on residential lots as well!
Download
(Simply copy each file from the folders inside the .zip file into their corresponding folders in The Sims directory [C:\Program Files (x86)\Maxis\The Sims].)
Optional Stop Line & Stop Sign Download
(Simply copy each file from the folders inside the .zip file into their corresponding folders in The Sims directory [C:\Program Files (x86)\Maxis\The Sims].)
105 notes
·
View notes
Text
Meringue | A G/Reshade Preset for The Sims 2 by Plumbaleena

If you're like me and rediscovering the excitement of The Sims 2, then you’re in for a treat! I’ve created my very first G/Reshade preset for The Sims 2—introducing Meringue! This soft and subtle preset enhances the game's visuals, creating a gentle, eye-pleasing effect on both objects and Sims while toning down the game's harshness. I absolutely love The Sims 2, and everything it has to offer and wanted to make a preset that would make me enjoy being in the game more than I already was. If you don't have Gshade installed (which is the program I use for both TS2 and TS4) you can follow this easy tutorial on how to install it onto TS2 HERE
Once Gshade is installed you place the preset in this location : C > Program Files > EA Games > The Sims 2 Legacy > EP9 > TSBin > Gshade-Presets > Custom
To toggle the background blur on and off, it is unique to all my presets and the same combination SHIFT + 2
❥ Here are some in game shots //


DO NOT USE MY PRESET AS A BASE FOR YOUR OWN TO PUT ON PATREON OR OTHER DOWNLOADING SITES - IT IS AGAINST MY TOU.
DOWNLOAD THE PRESET HERE
47 notes
·
View notes
Note
Could make a tutorial for creating subtitles on Photoshop for beginners! Thank you so much, continue the amazing work!
thank you nonny! i'm glad my tutorials are helping at least one person.
creating subtitles is quick and easy. i'll go over simple subtitles, and also making subtitles appear partway through a gif. once you know how to make them i recommend saving an action for it, for your most common gif sizes, that way you can just press one button and then type in your subtitles.
Font Overview
it's good to have a go-to font. i use Calibri Bold Italic, but any clean, simple print font can work
these are my font settings below. quick rundown of each option
A- this your font family B- this is the specific font; light, regular, bold, italic etc. C- this is the font size D- this is the spacing between each row of text; it's default setting is [auto], which uses the built-in font spacing, but all fonts have different spacing and you could end up with a huge gap between rows. the spacing pt's also don't necessarily match up with the font size, so experiment to get the spacing you want E- this is the space between letters; if you think the letters are too close together then increase the number into the positives, if you think they're too far apart then decrease the number into the negatives F- this will "stretch" the letters sideways; not really used for basic subtitles G- this will stretch the letters up and down; not really used for basic subtitles H- this is your font colour

the setting above are my go-to for 540px gifs, though i occasionally adjust the font size between 18-22, and then also adjust the row spacing to match. for 268px gifs, i'll usually use a font size of 16px
Basic Subtitles
to make the subtitles, select the text tool the left hand toolbar, the icon that looks like a "T", and your cursor will turn to a text selector line in a dotted square. put your cursor at the bottom left of the gif; it doesn't have to be exactly on the corner, but so long as it's close the the edge of the canvas it will "lock on" to the corner.
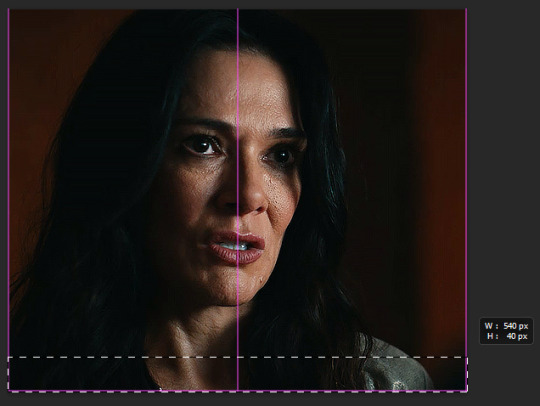
click and drag to the right side of the gif, and up as big as you want the "text box". there will be a pop-up tell you the width and height of the box you're making. width should be the full width of the gif, and for the height i've set it to 40. the top of the text box will be the very top of the letters on the top row.
the size of the text box can always be adjusted later by clicking a side and dragging.
type your subtitle into the new text box, and then click anywhere outside the workspace (the canvas and the grey area behind it) to "exit" the text layer
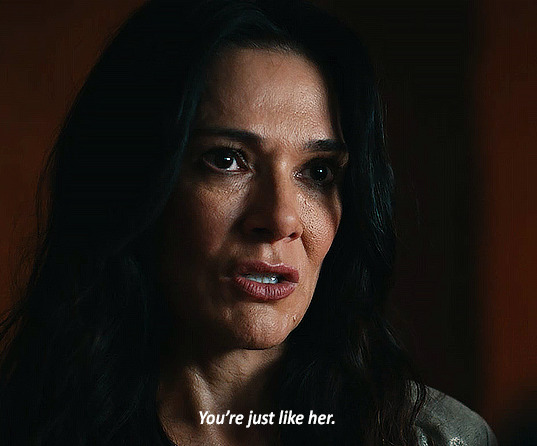
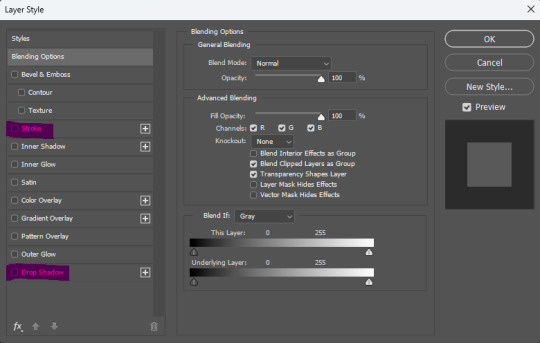
now the text looks pretty good here, because the parts of the gif under it are dark. but a different gif might be lighter, or you might be using a different text colour. to make sure the subtitle is visible and readable on any gif, you're going to go to the menu on the bottom right, with the text layer selected, and click the fx button. any option in the menu that appears will open the same box, just on a different option, i always just click blending options

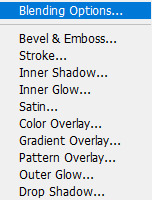
the layer style box will open. all the options on the side are various effects that can be applied to the text. the ones with a plus sign will allow you to add multiple instances of that effect on the same text. the 2 we'll be using on the subtitles are stroke and drop shadow, so one at a time click on the row for both and a check-mark will appear in the box. you'll also see that effect labelled under the text layer
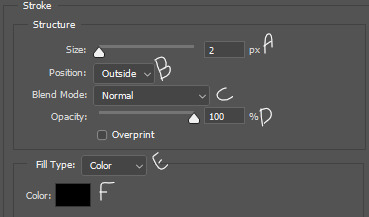
this is the menu for stroke. stroke is simply an outline of the text/object
A- this is the size of the stroke, the width of it B- position can be outside, inside, or centre. for subtitles it should always be on outside C- this changes the blend mode of the stroke, which will have essentially no effect if the stroke is black or white D- the opacity of the stroke E- you can have a stroke made of a solid colour, a gradient, or a pattern F- the colour of the stroke
this is the menu for drop shadow.
A- blend mode, again, doesn't do anything if the colour is black or white B- colour of the drop shadow C- the opacity of the drop shadow D- the angle of the shadow E- make sure this in unchecked, otherwise it can screw with the angle F- this is how far from the text the shadow will be G- this makes the edges of the shadow sharper or harder H- this makes the overall shadow sharper or harder
the options under "quality" i never adjust

click ok on the layer style box and you have your basic subtitles!

Fade In Subtitles
now maybe you have a slightly longer gif, where the character isn't speaking at the beginning of it and you want to time the subtitles with the speech. so we're going to use keyframes!
keyframes do various things, by setting two (or more) points on the gif, and the gif will automatically change between those two points, depending on which keyframe you use. (hopefully this will make more sense a little further down)
first play the gif a few times in the export preview window to see when the talking starts and then move the frame tracker (the red line) to 2-3 frames before the speaking begins, in this gif the character starts speaking at frame 50, so move the frame tracker to frame 48

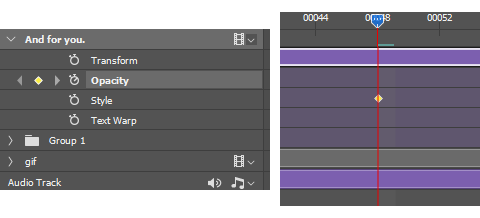
when you click the arrow at the start of the layer, it opens a dropdown of the layer and gives various options to use keyframes on, depending on what kind of layer it is. clicking the little stopwatch will create the first keyframe
transform- this lets you change the size/orientation of the text opacity- this lets you change the opacity of the text style- this lets you change the layer style of the text text warp- this lets you animate the warping of the text

when you click the stopwatch, a keyframe will appear on the timeline on the frame selected, and next to the stopwatch two arrows with a keyframe point between them will appear. the arrows move you from one keyframe to the next, and the point between the arrows will add a keyframe on the selected layer, or remove the keyframe if there is already one there. if you click the stopwatch button again, it will remove all keyframes
while the tracker is on a frame that has a keyframe attached, anything you do that falls under that type of affect while on that frame will be recorded by the keyframe. on opacity there's only the one thing that will be recorded—opacity.
since we want the text layer to be invisible when the gif starts, turn the opacity down to 0, while on the frame with the first keyframe. now move the tracker to the frame where the speaking begins. add a new keyframe on frame 60 using the new keyframe button. then turn the opacity on the text layer back up to 100
now the text layer will go from 0 opacity to 100 opacity over between the 2 keyframe points, and gradually appear as the character begins talking. if the timing isn't quite right, you can click and drag the keyframe points along the timeline.

A Few Random Notes
some people use white for an entire gifset, even if more than one person is speaking, and some people use different colours to show who is speaking. you can have set colours for speaker #2, #3, etc. but when possible, i like to use the eyedropper to select a pixel colour for the other speaker that is already in the gif, but not prominent where the subtitles will show, so i don't add a colour that wasn't already present, and reduce the number of colours in the gif itself
if the subtitle is long enough to go on two lines (or more) try and cut it to be somewhat even i.e. don't have the top line stretch from side to side, and the bottom line only had 1 or 2 words; if there's a comma or semi-colon in the text, splitting it there as a natural gap/pause
if there are two people speaking in 1 gif, and you want to show their dialogue at the same time, you can put the two different speakers on separate lines of the same text box, highlight one of them, and change only that colour
#cleo gets mail#anonymous#tutorial#gif tutorial#typography tutorial#photoshop tutorial#gifmakerresource#completeresources#*tutorials
47 notes
·
View notes
Text
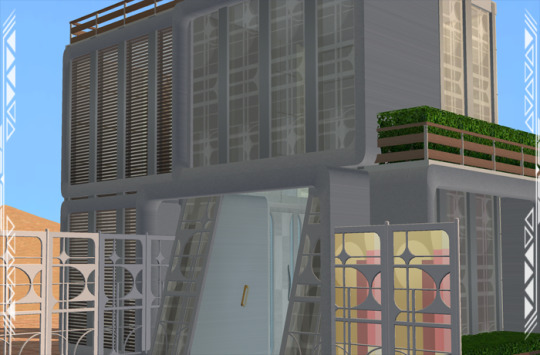
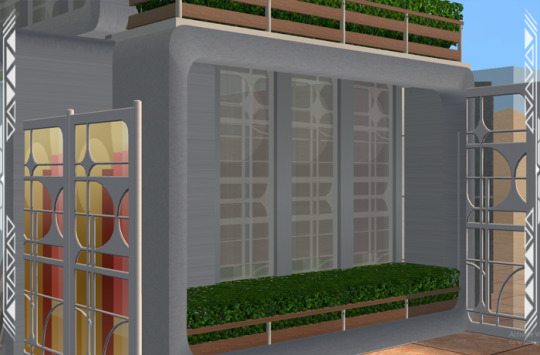
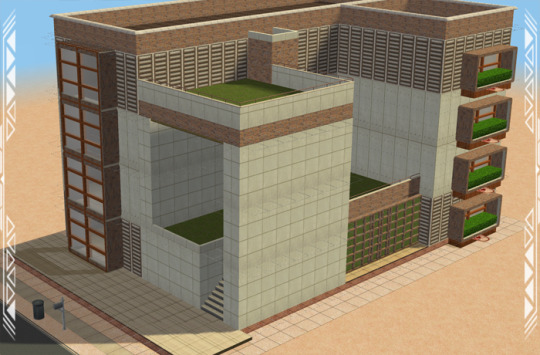
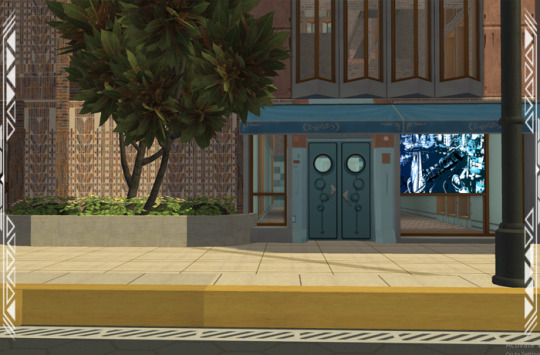
Space-O-Rama Build 001
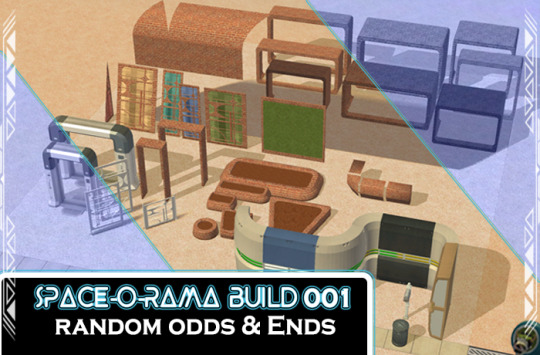
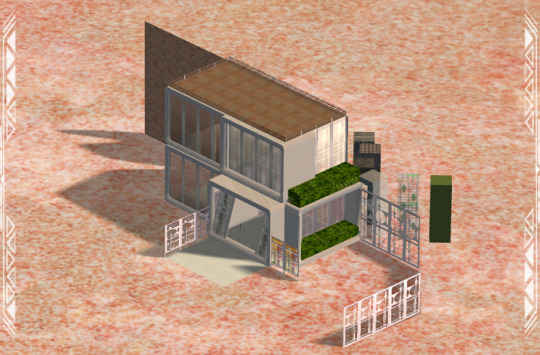
Published: 7-19-2024 | Updated: 7-20-2024 SUMMARY “With intricate geometric patterns, delicate parabolas, and inverted inversion, Space-O-Rama glass sets a new standard that’s out of this world!” An odd mixture of low-to-mid poly items for retro-futuristic builds, inspired by the Space-o-Rama glass fences (Pets EP). There are 41 objects and a host of recolors using texture resources from PineappleForest (2022) actions from CuriousB (2010), Pixelhate, and Klevestav (2015; 2013). Many of the recolors have a weathered/distressed look.
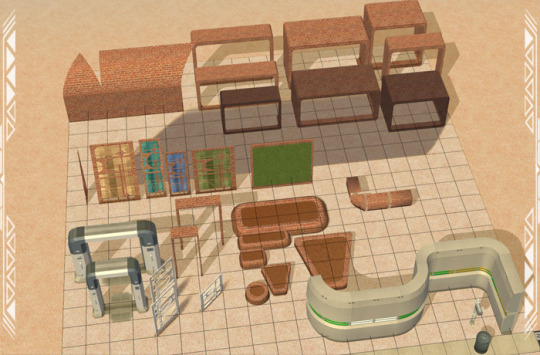
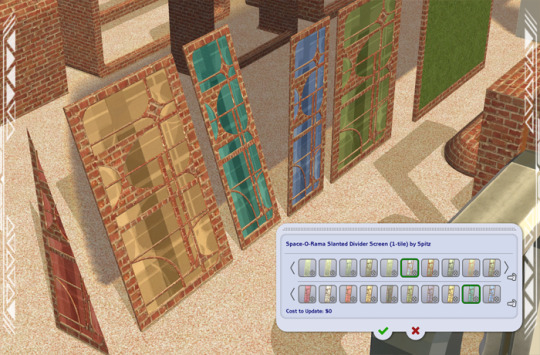

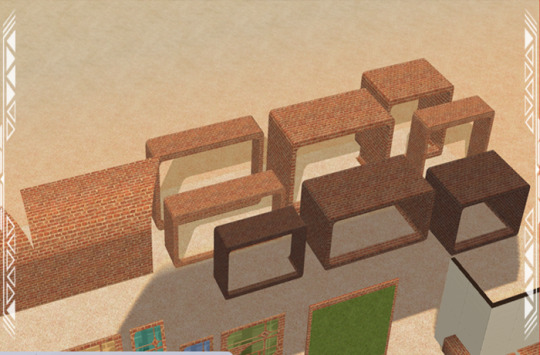
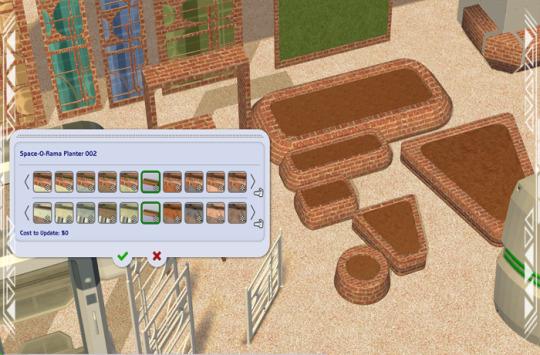

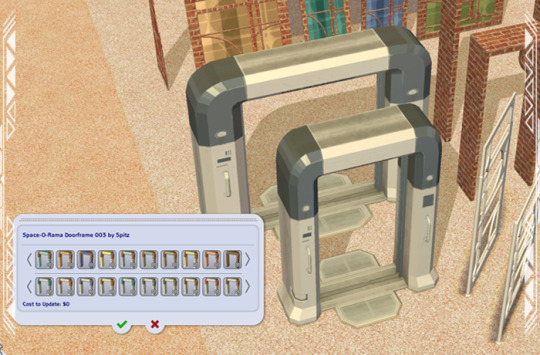
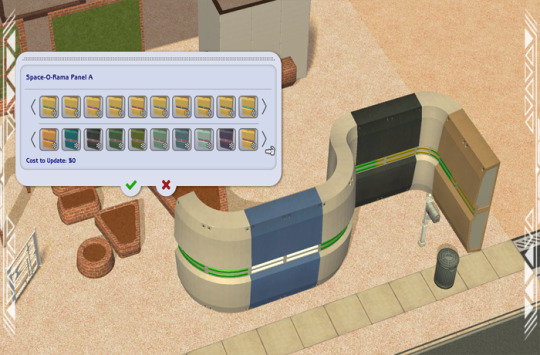
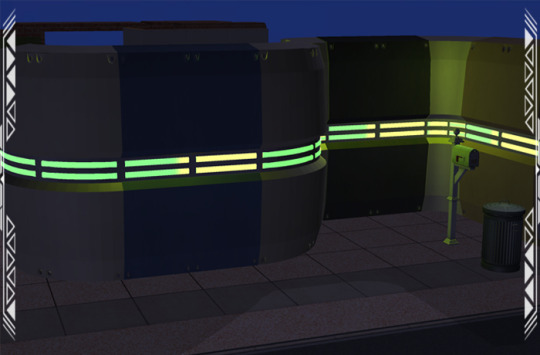
DETAILS Requires Uni, Nightlife, and Apartment Life Eps. §100-500 | Build and Buy Files with “MESH” in their name are required. You also need the BBNiche1Master (BuggyBooz, 2012), Elemental TXTR Repository, and he Graphic Glass TXTR Repository from the Repository Pack (Simmons, 2023). Additional repo pack recolors can be found on this site under these tags - #co2recolors, #ts2recolors, #ts2repo #co2repo #co2repopack. ITMES 3 Fences (~1622 poly) 5 Divider Screens (1025-1528 poly) 8 Window Boxes (Columns) (576 poly) 4 Doorframes (Deco) (92-1353 poly) 2 Door Rugs (Columns) (34 poly) –for doors 003 and 004 7 Planters (546-1092 poly) 4 Wall Accents (Columns) (8-12 poly) (3) Neon Panels A-C (1080-1521 poly) – sharp corners and some overlap (shadows look better than when the mesh is completely smooth); small gap on the side ; requires the Nightlife EP. 3 Bunker Walls (22-24 poly) – some overlap 3 Garden Panels (99 poly) *You’ll need “moveobjects on” and “grid on/off” cheats since not all parts align perfectly. DOWNLOAD (choose one) from SFS | from MEGA
7-20-2024 UPDATE : Added alternative versions of Doors 3 and 4. The texture on the top interior was distorted when the poly count (“faces”) got reduced. I recolored that part separately in black. If you want the alternative versions, manually delete old files (they are “..doorframe3-MESH” and “…doorframe4-REPO”) and replace them with these new files (“…alt2”). DOWNLOAD (choose one) ALTERNATE DOOR 3 & 4 from SFS | from MEGA CREDITS Thanks: Simmers with meshing, cloning, and fencing tutorials. Sources: Beyno (Korn via BBFonts), Sci-fi House (AiKu via Creative Commons Attribution, 2018), Space-o-Rama Divider (EA/Maxis), 4t2 Eco Living Door (Ethan, 2020), Streets of Utopia (Stonemason, 2024), SciFi Panels (Unity Fan via CCA, 2023), Scifi Gate (Stan via CCA, 2023), Bomb Rush Cyberfunk Street [fan art] (Max Staples via CCA, 2023), Modular Bunker (mats de Wind via CCA, 2020), modular Walls (detona via CCA, 2018).


140 notes
·
View notes
Text
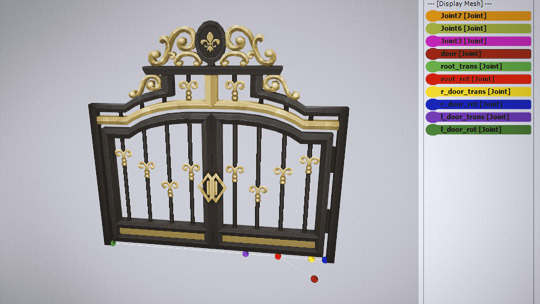
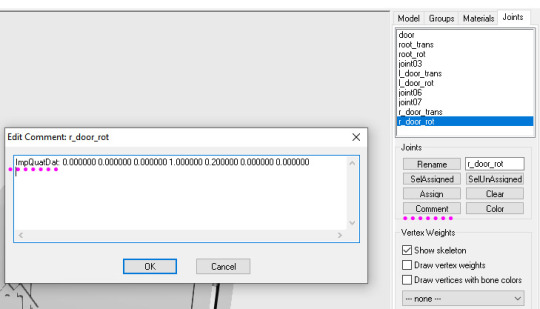
Tutorial: How to adjust joint position (in TS2 object skeleton)
This tut is NOT meant for beginners because I don't explain how to use SimPe or Milkshape. But actual process is very basic: you change joint coordinates and do GMDC model rebuild. The tricky part is to get coordinates right.
If you don't know much about joint assignments, start with this tutorial: "Retaining object animations in your new package" by Bluetexasbonnie @ MTS2, which explains how to add joint assignments to custom stuff cloned from functional objects (to make parts of the mesh move when Sims interact with it).
The pic above: SimPe GMDC skeleton preview. You can click on each joint name to see which part is assigned to it. Gate is here.
This will work for simple object skeletons without IK Bones.
There are no plugins that would allow us to properly import TS2 CRES skeleton data with IK bones - like sims, pets and more - to any 3D program
If object has IK Bones - you'll find out when importing CRES to Milkshape. If it displays a notification "joints with rotation values found...", IK Bones are present and there's a high risk that skeleton: A. will not be imported. B. if it's imported, it will get mangled. C. will be mangled after using model rebuild option.
I've experimented with car skeletons (those have IK Bones), managed to edit car door joints but it required removing wheel bone assignments - because wheel movement becomes wonky after doing model rebuild
/FYI: steps 1 - 5 are optional, you can edit CRES joint coordinates right away if you know the right values - which is usually not the case/.
Export GMDC with your custom mesh
Export CRES (if you wish to preview entire skeleton and/or joint names)
Import GMDC to Milkshape
Import CRES (if you need it. Plugin is called: Sims2 AniMesh CRES Skeleton Import. Click 'yes' to 'replace all bones?'). You should be able to see entire skeleton imported. Note that Milkshape won't let you export a GMDC after you imported CRES skeleton unless you change joint comments (point 7.)
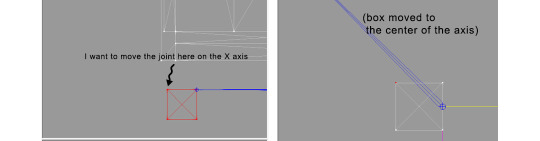
Measure how much you need to move the joint. You can create a box as ruler substitute, then check the distance with extended manual edit plugin. If you're not sure where to place your joint, you can move it and test if object animations look alright (import CRES again to reset joint position).
tip: when working on GMDC in Milkshape you can rename the model parts in model list (door right, door left etc). Only names inside the model comments actually get exported.
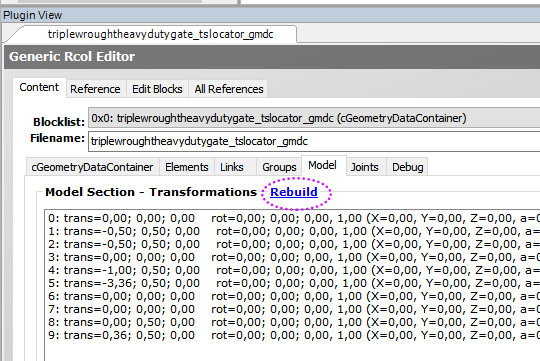
6. Go back to SimPe, open CRES resource. Remember TS2 is using flipped coordinates: X = -X, -X = X, Y = Z, Z = Y. Edit joint Translation data, commit, save.
Optional: you can export CRES skeleton again and import to Milkshape to test if joint has moved to the right position.
7. Go to GMDC, Model tab - hit rebuild, commit, save.
if you have the edited object placed on a lot, it's gonna look weird when you load the game. You need to re-buy it from catalogue to see results.
If for some reason you'd like to export entire GMDC with your imported CRES skeleton, Milkshape won't let you do that. You'll get "ERR: No quaternion values stored" error. You need to go to Joints tab and edit each Joint comment to ImpQuatDat: (that's imp, with capital i )
Notes:
if you go to GMDC Joints tab, there's also a rebuild option to update single joint - but I've tried it on car door joints and it didn't work.
If you edit joint coordinates in CRES, for example- move the car door forward, and preview skeleton in GMDC viewer, your model is gonna look fine. But in the game every vertex assigned to that joint will also be moved forward. That's why you need to use model rebuild option. In theory, if you'd like to skip rebuild, you could import GMDC to milkshape and move the door backwards to compensate for joint adjustments? I haven't tried that (yet).
81 notes
·
View notes
Text
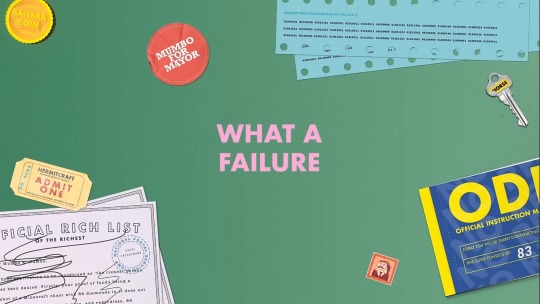
What’s Up With Those Title Cards, Anyway: An Analysis
Now that Mumbo’s second episode is out I find myself thinking about these title cards again. And as much as I realize that they’re meant to be a fun nod to previous Hermitcraft seasons and Mumbo’s place in them, the items included and the context of their presence raise a whole lot of questions for me.

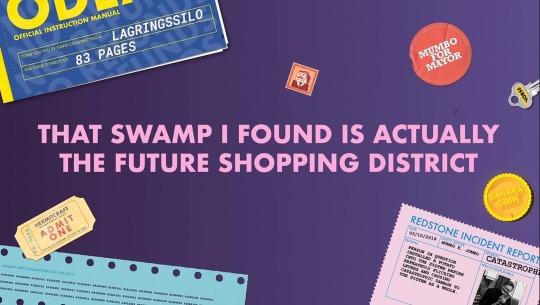
First of all, these aren’t blocks, they’re real items. Many of them don’t even have equivalents in the world of Minecraft (or even in Hermitcraft). Think about that. Are the blocky forms that we see on screen mere representations of a larger, more high-resolution world? A world with stickers and stamps and keys? A world where a ticket to Hermitcraft is a physical object you can hold in your hand? This certainly seems to imply so.
What is the context for these items? Where are they? Where are we? The stylistic choice was made to have them sort of resting on a solid-colored background. The selection of items makes me feel as though this is a representation of a desk of some kind, items important enough to Mumbo for him to keep around, lots of paperwork and stuff that you might find in a private office drawer. Which just raises even more questions. How does Mumbo keep these items from season to season? Where are they right now? Do they actually exist at all? (Not to mention smaller timeline questions. When did Mumbo receive the Grumbot message? When was it sent? Does the Grumbot left in Season 7 have a different consciousness than the one in Season 9, which last saw its dads only a month or two ago?)
If you follow the Rendog school of Hermitcraft lore, I guess you could say they’re kept on the Hermetheus along with all the other season-to-season holdovers and souvenirs. But that is one interpretation of many, canon to Rendog but never really canonized on a server-wide scale. Plus… if we take that interpretation in its entirety, how do the items from season 8 even exist, given that their entire world was canonically a simulation?
I also notice the relationship between the real world and the Minecraft world, the distinction between Mumbo the youtuber and Mumbo the block man. The ‘Official Rich List’ certificate mentions a ‘screenshot of a Minecraft chest’, implying that whoever wrote this certificate knows what Minecraft is from an outside perspective and finds Minecraft diamonds to be meaningless as a measure of wealth. And yet the certificate is addressed to one Mumbo K. Jumbo. The middle initial, having its origin in a highly in-character storyline during season 8, makes me feel like it could be more of a character Mumbo thing, but there’s no hard evidence.
How does Mumbo even have a picture of real-life Grian? Is this redstone incident report out-of-universe too? Who is he reporting this damage to, anyway?
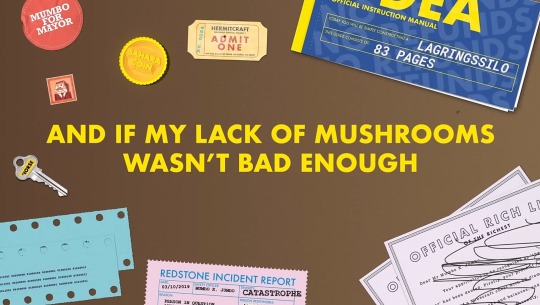
And yet these are placed alongside items that are definitely from inside the world of Hermitcraft, if only the more fleshed-out version of it. A key to a mechanical car-horse would be functionless unless it was actually used, in-universe, by Mumbo the character. The ODEA manual was an idea considered but rejected by Mumbo during Season 7 in favor of tutorial videos, but perhaps this would make sense as an alternative for a world where the characters live in their Minecraft world as reality and have no capability to access the ODEA website.
Perhaps, in Mumbo’s view, there is little distinction between what we in the fandom call c!Mumbo and cc!Mumbo. We see both in-universe and out-of-universe items side-by-side, contradictory, because they are interchangeable here.
I doubt we’ll ever get any answers to these questions because obviously Mumbo made these title cards as fun little references instead of serious or purposeful lore, but I still think it’s fun to think about. Neat little worldbuilding details like this are few and far between in most mcyt content so I was foaming at the mouth when I first saw these. Well done Mumbo!
181 notes
·
View notes
Text
I'm sick rn and writing is taking a while so here take this
Twst SCP AU (Some headcanons and ideas):
Classes, Clearance Levels, and Positions:
Classes
Class A: The staff, the dorm leaders, (except Kalim)
Class B: Ignihyde students
Class C: Kalim, Ace, Deuce, Ruggie, Jack, Epel, Trey, Cater, Sebek, Silver, Rook, Jade, Floyd
Clearance Levels:
Level 1: Mob students
Level 2: Mob students
Level 3: Ace, Deuce, Ruggie, Jack, Epel, Sebek, Silver, Rook, Kalim, Jade, Floyd
Level 4: Leona, dorm leaders apart from Kalim Riddle and Azul
Level 5: Staff, Riddle, Azul
Positions:
Researchers: Riddle, Trey, Cater
Ordinary jobs (e.g clerk, janitor) and Tech teams: Mob students
Field agents: Ace, Ruggie, Floyd, Jade, Rook, Sebek, Silver, sometimes Lilia
Mobile task force members: Deuce, Jack, Jamil, Epel, Ortho, Lilia
Disclosure officer (assigns clearance levels): Riddle
Mobile task force commander: Leona
General hcs:
•The NRC boys work for the SCP foundation
•The school staff are part of the 05 Council, though Trein and Crewel are the main ones who get stuff done
•The overblot boys are both scps and staff (if happens!) Most of them are Euclid, but Malleus is Keter
•Grim and Yuu are scps (Class: Euclid)
•The foundation exists in twst even there is magic, as their are thing that defy their current scientific knowledge and are a threat
•The foundation works with S.T.Y.X
•Riddle is extremely strict but it's very valid here because people can die
•Kalim is... not good at most of his job, and he would've been fired if it weren't for the fact that certain scps are more responsive to him and like him (hence why he's Class C instead of A)
•Leona may be unmotivated, but he disciplines his mtfs and the Class D thoroughly if needed. His UM is used for neutralising scps or D Class if needed
•The octotrio are often involved in sea/ deep sea related scps or research
•Everyone can still use magic and their UMs, but magic is restricted in certain areas or scenarios
•The dorms aren't quite as divided as they are in canon, since everybody is mixed together depending on their field
To understand the terminology, give these a quick listen (and the rest of the podcast if you're interested):
#quinn quips#twst au#twst scp au#riddle rosehearts#azul ashengrotto#floyd leech#jade leech#kalim al asim#jamil viper#rook hunt#leona kingscholar#idia shroud#malleus draconia#twisted wonderland#Spotify
64 notes
·
View notes
Note
How are you so good at ikeaframe/orbiter fashion... share some tricks on how to get pieces to get into position you want, most versatile decoration pieces (that can be used in many different ways, what are your favorites?); on a less serious note, how to farm all this standing for all the zariman wall panels ;A;'
So, quick disclaimer: I play Warframe on PC and have never played on console, so all of my answers will be oriented to PC controls.
Edit: This got quite detailed, so I may wind up making this a multi-part Thing.
Positioning:
Understand the anchor point; this is the point on an object that cannot pass through other objects and around which it is oriented. To find it, select an object and right-click to orient it; where the 3 different orientation guiding lines fall is an object's anchor point.
Understand orientation; if you hit Tab to turn on advanced mode it will show this, but I'll put it here for good measure. There are 3 planes of movement: up-down, left-right, and forward-backwards. R controls the orientation marked by the red arrow, F by the green arrow, and X by the blue. (If you have selected an item with your mouse, you can also hold X to 'push' an object, but I don't use this often as the direction and depth can be hard to predict.)
Grid and angle snapping are your friends! They're going to make your life a lot easier when you need to place objects at consistent distances, angles, etc. Now that you can angle things by degrees of 1 or 5, it's a lot easier now to make small adjustments without having to turn off angle snapping. Also: one way to ensure consistent distancing is to choose another feature (e.g. lines on the ground) and use that as a reference point. This is something that I use a lot especially when decorating my clan's dojo.
Using F to duplicate objects, and using C/V to scale them up/down will help when placing multiples of the same object so they will be the same size and orientation. It's also a time saver so you don't have to size and orient every single object you place. (If you're going to scale something all the way up or down, just hold R and use your mouse to quickly get it to size.)
Using Z to change how you can orient objects. 'World' will orient the object in relation to how it's been placed. 'Local' will orient the object based on its anchor point. (If this doesn't make sense, I encourage you to experiment to understand the difference!)
Sometimes, even when using grid and angle snapping, things won't quite line up right. That's when you want to turn off grid snapping to make small adjustments. Ideally, you would hover your mouse over the object and then hit R to turn on constrained movement. When doing this, I suggest only adjusting one plane at a time (R, X, F); for example, moving it left or right, then saving it to lock in that adjustment before trying to move it up/down or forward/backward.
If you've moved an object and dislike the result, instead of saving it, hit Esc. It will put the object back to where it was before you messed with it.
Experiment! Sometimes redzones will get in the way, but you never know what areas are available to be decorated until you give it a shot. Rotate objects every which way to see the different sides and features; for example, I had no use for the Entrati Serpentine Chair until I realized that I could use the underside to decorate the walls.
Sometimes an object just won't behave the way you want it to; if it's a symmetrical object, try turning it around. This is a big one when you're trying to get 2 objects to touch, but the anchor point is getting in the way. In the case of the Zariman wall panels, if you look at it from the side you'll notice that one side bevels out, while the other is completely flat; I put the curved side down, which is how I was able to have that nice flat, flush wooden flooring and on the ceiling.
Hopefully you find this helpful; I also suggest looking up tutorials on YouTube! They were especially helpful in making me understand how anchor points and orientation work, since they also have visuals for you to accompany the explanation.
I'll make another post addressing other parts of your questions :)
39 notes
·
View notes
Text
Blender: Which Buttons Do I press? (Part 1)
There are a lot of tutorials where you already need to know how to "do the basics" like "maneuver the camera." So this tutorial is focusing on the Buttons- not on the sculpt or the object, just on the buttons and shortcuts that I personally use in Blender.
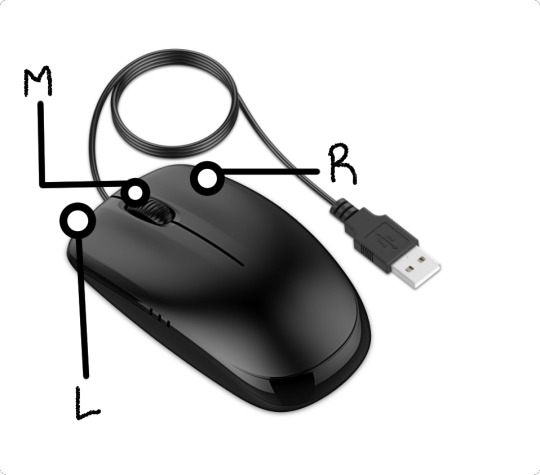
Note: You will need a mouse with 3 buttons / scroll wheel for this.
Before we start, I'm going to explain which shortcuts I use in this, but, not to make myself redundant, there's a shortcut for seeing shortcuts: Press Spacebar + Shift to see all available shortcuts in each mode.
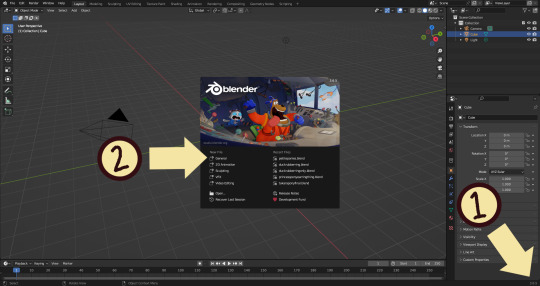
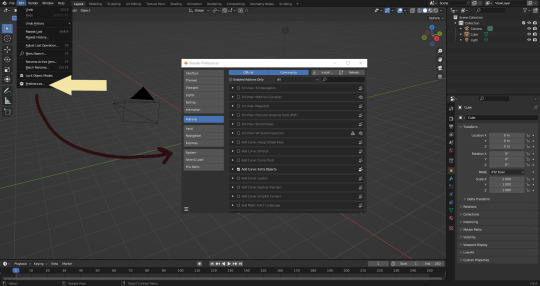
I'm using Blender 3.6 for this tutorial. I recommend you use the same. It's completely free and has a lot of great features! For this tutorial though, 3.4 will likely work as well.
Click "General" under New File.
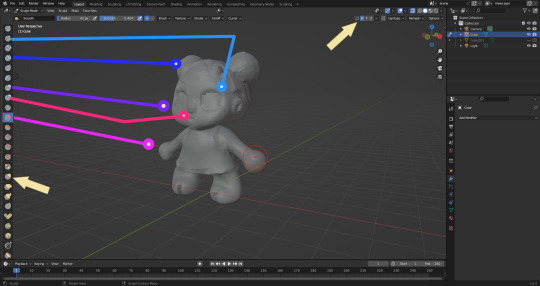
Your screen should look like this. There are 3 default objects in the file: Camera, Cube, and Light source.
3. This bar indicates that you are in Object mode. This menu will allow you to go into other modes depending on the object you have selected.
4. Lets talk about shortcuts. You can zoom, rotate, and move the screen using buttons at the top right, but I haven't marked those because I will teach you a better way. Feel free to click them all and see what they do, but I assume you're here because you don't want to explore every button in this godforsaken program the hard way.
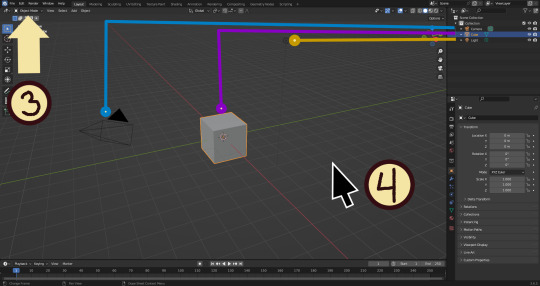
Below, the Left and Right buttons are marked as a reminder as well as the Middle button which is also the scroll wheel (press down to click it)
Left click: Select an Object Left click and drag: Selects multiple objects Scroll Wheel: Zoom in and out Middle Click and drag: Rotate your view Shift + Middle Click and drag: Move your view Right click: Brings up a menu that won't be relevant here. Shift + Right Click: Moves the 3D cursor. Not important for this tutorial, but I do it on accident a lot. Hit Shift + C to reset the cursor and also to reset the viewer position to see all objects at once.
Move the viewer around as practice! You're gonna need to do it a lot while modeling. If you have a keyboard with a Numpad (the calculator-looking thing on the right side, says Num at the top) you can use Numpad 1-9 to automatically adjust the view to front, left, right, backwards, and different angles. If not, test out the rotate tool at the top right which does something similar.
There's a helpful menu I use to switch between Modes (if you hit the dropdown menu where it says "Object Mode" you can do this without the shortcut); click Preferences to enable it.
Hop over to the Keymap section and check "Tab for Pie Menu"

And then close the window. No "Save" button is needed.
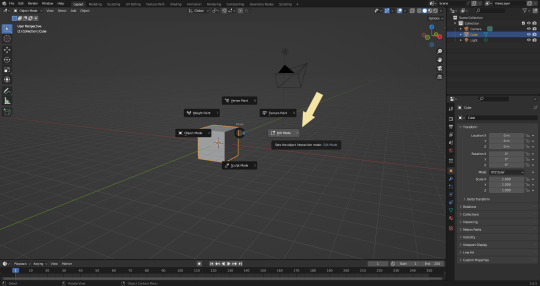
Now that you have the shortcut enabled, select your box with Left Click, hit Tab and Left click "Edit Mode"
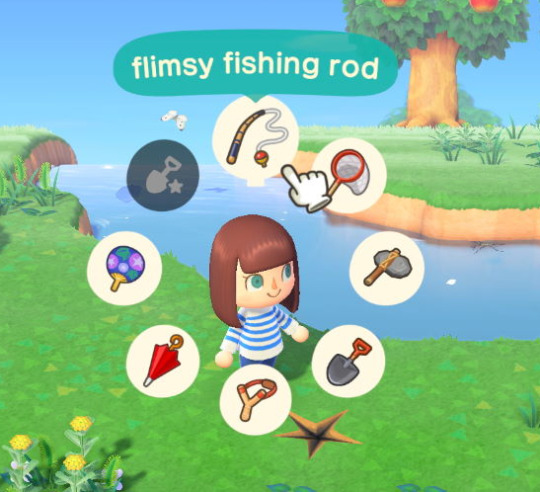
And yes, this is just like the Animal Crossing tool ring:
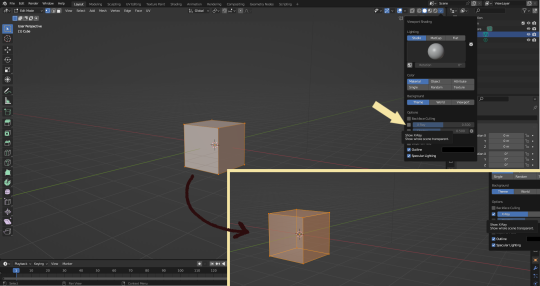
Now that you're in Edit Mode (You can swap back anytime by hitting Tab -> Object Mode), click arrow at the top right to open a menu where you can check the "X-ray" box. You'll be able to see through your cube. As a reminder, Spacebar + Shift will show you the available shortcuts in this mode, but I'll go over the important once momentarily.
What is a 3D object made out of?
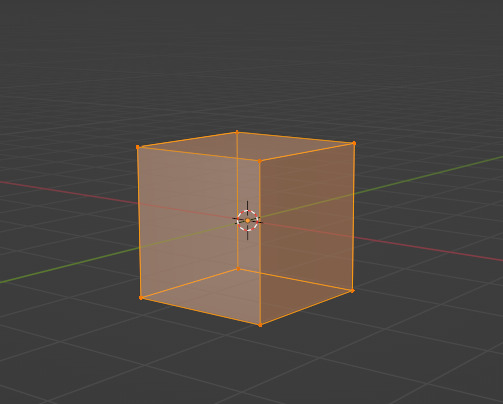
This box is made out of vertices, and each face of the cube has four vertices at each corner- a triangle with three vertices also works, but we'll stick with squares for this tutorial. Moving the vertices will change the shape of the box, like a piece of stretchy fabric over a wire frame.
From now on, I'll be calling the vertices dots, because I hate reading and typing the word vertices over and over again.

5. By all means you can fiddle with the buttons over here but I'm gonna show you the shortcuts I use and the buttons you'll actually need. Don't get intimidated by the amount of buttons. Also press the T key and the toolbar will go away!
(Seriously, though, feel free to play around in this section as much as you want to, but we'll go over the shortcuts a few at a time with examples. at the end of this section will be a summarized list.)
6. Left Click one of the dots and press the G key. You'll see below a whole bunch of additional shortcuts show up at the button. Here are the ones I use:
G key: Grab and move around the dots
R key: Rotate two or more dots*
S key: Size two or more dots*; if two dots are selected, the distance between the dots will change but the angle between them will stay the same.
*Left Click and drag to select multiple dots!
CTRL + Z to Undo edits.
When you move a dot with the G key, imagine that the dot is against a piece of glass at a fixed point ahead of your viewer. The dot will not move farther or nearer to you, but will instead move parallel to your view.
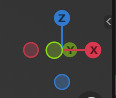
As an example, if you press Numpad 1 and view the object from the front (The -Y green circle will be at front and center in the rotate tool), the dot will only move left and right (X axis) and up and down (Z axis). It will not move farther or nearer on the Y axis by default.
Play around with the G, R, and S tools before moving on.
This little X button at the top right will turn on symmetry. You don't need to use this, but it can be useful.
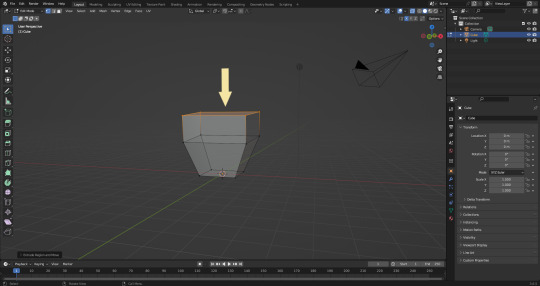
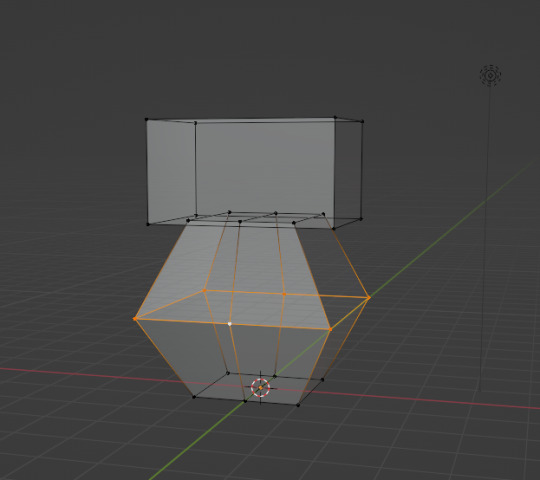
Left Click and drag so that an entire face (flat square) is highlighted and then press the E key to extrude. Extruding will add another set of dots that are automatically connected to the first set.
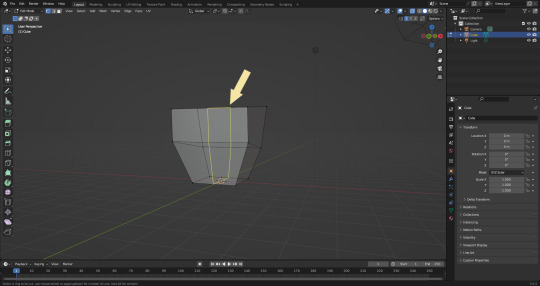
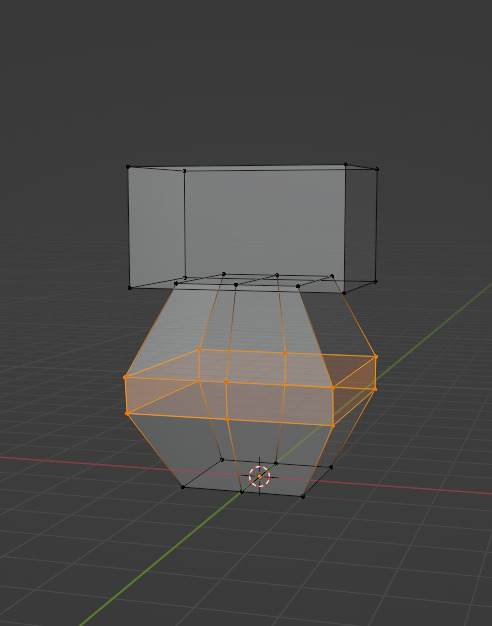
Ctrl + R adds a loop cut. This will divide the existing faces into two and add more dots. You can also drag loops to slide them to different positions.

The 3 key (not on the Numpad) will switch your Select Mode to Face Select. This is useful for extruding. Essentially it is simply selecting all the dots at the corners of the squares.
The 1 key will switch back to Vertex Select (or Dot Select) mode and the 2 key will switch to Edge Select (the least useful of the three, to me)
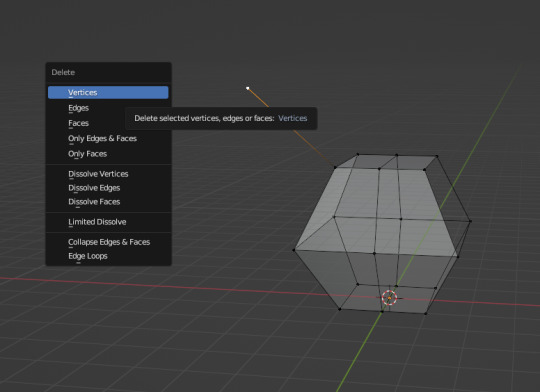
Before we go wild, there are a couple of additional things to know. For the tutorial, focus on working with faces, not vertices. If you accidentally pull a single vertex, select it and press the X key to delete it.

If you want to add shapes, I recommend sticking to cubes for now. Ctrl + A will open the Add Mesh menu and you can add a cube. Feel free to have complete cubes overlap for this tutorial.
Double Left Click will select a series of dots connected in a loop, and can be helpful for selecting areas all at once.
Ctrl + B is the bevel tool, and when a loop is selected it can turn it into two.
Here is a summary of all of the Edit Mode shortcuts:
G key: Grab and move around the dots R key: Rotate two or more dots* S key: Size two or more dots* *Left Click and drag to select multiple dots Double Left Click will select a series of dots CTRL + Z to Undo E key to extrude faces Ctrl + R adds a loop of dots Ctrl + B splits one loop into two X key -> Vertices to delete dots (vertices) 1, 2, 3 keys to switch Select mode Numpad 1-9 to move viewer automatically Ctrl + A to add a shape
Go play with them. See you back here in a while.
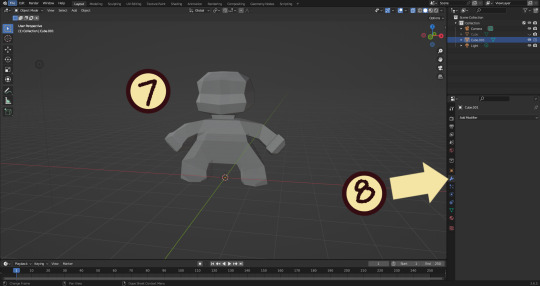
7. I used a single cube to make this figure. It's still very blocky, but that's fine. Loop cuts created additional faces which were extruded to create arms, legs, and a neck. Definition to the face was added by selecting individual dots. Remember, Ctrl + Z (undo) is your friend!
Once satisfied with the shape you made - a boxy figure or object is fine- continue on.
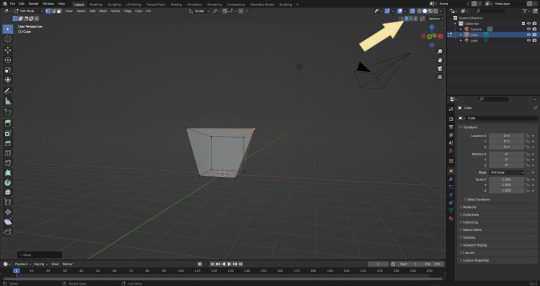
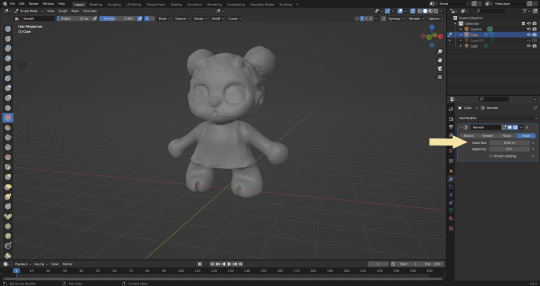
8. Press Tab -> Object Mode. Turn your attention to the right hand bar and make sure the Wrench button is selected. Note the Add Modifier Button.
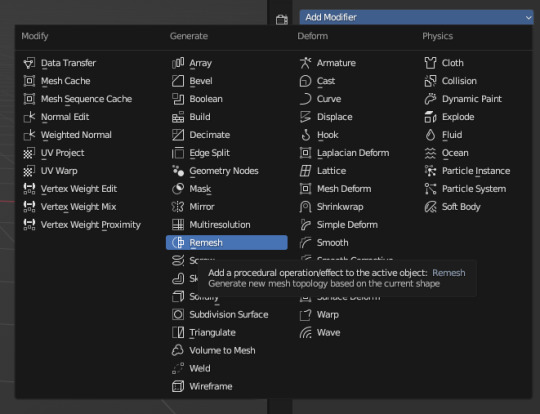
There are a heck of a lot of buttons here that you don't have to worry about- just select Remesh.
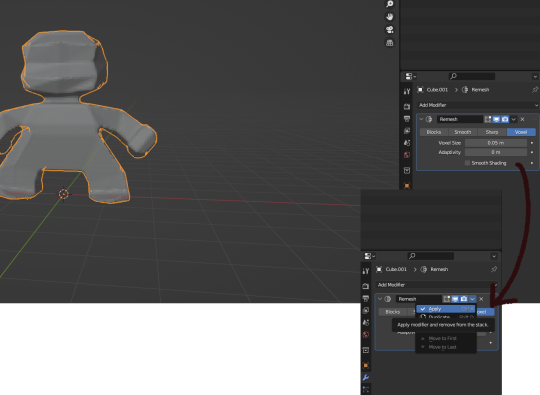
Change the number under Voxel Size to .05m by Left Clicking and typing it (there is a slider, but I find this causes lag). Then, apply the remesh by clicking the down arrow and selecting Apply.
Your figure should be shaped similar to before, but have a slight "graininess". If you have added multiple cubes, it will seamlessly merge them into one. The smaller the Voxel Size you put, the more dots will make up your object. However, I suggest starting with something in the .03-.06 range. We will refine this later.
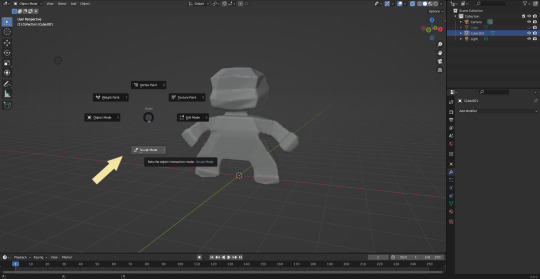
Press Tab and select Sculpt Mode.
This is a mode where I actually use the tool bar for modifying my sculpt, as there are a lot of brushes . The icons show roughly what the brushes do using small icons (note on adjusting this below)
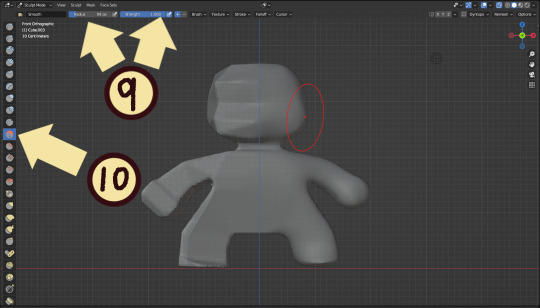
9. Observe the Radius and Strength bars, which will adjust the... well, the size and radius. Note that although the "brush" looks like a flat circle, the affected area is actually a sphere. Select a brush with Left Click and Left Click and drag on the sculpture.
10. This is the smooth tool. I have smoothed out the right side of this figure. Note that I turned off symmetry to do this, but i usually have X-axis symmetry selected.

Although I am used to the small buttons, there is a way to change them. Hover near the toolbar to Left Click + Drag so you can see the names. Hold Ctrl + Middle Mouse button and drag to resize. You will be able to make the size of the menu much larger. This goes for many of the menus in Blender.
The above arrows point to the symmetry button (Top right) and Grab brush (bottom left). The Grab brush uses the shortcut G Key.
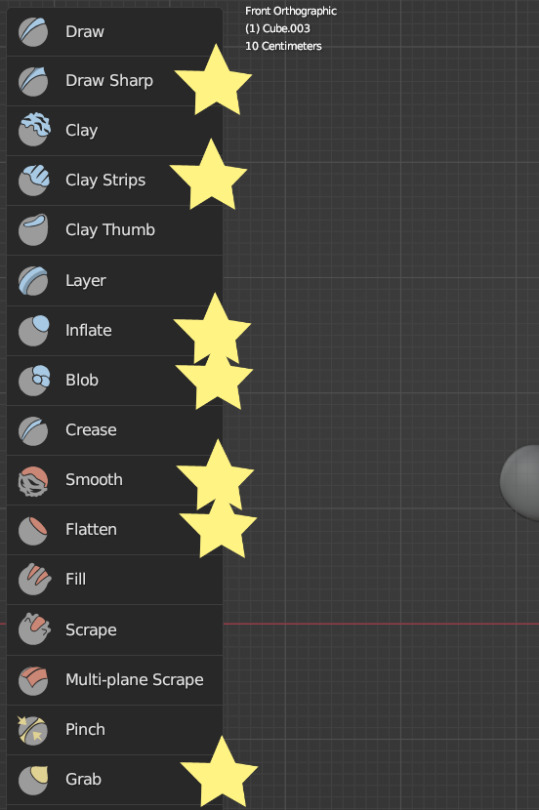
The lines point to which tools were used for each part of the sculpt. The Draw Sharp tool was used to mark out eyes. Clay strips made the hair texture. Round cheeks were added using the Inflate tool and a nose (and buns) were added using the Blob tool. The aforementioned Smooth and Flatten tools were used judiciously to remove sharp edges.
I don't have a shortcut list for you here, but here are all the tools I use the most:
You can hold the Ctrl key while using the brush to reverse its effects. For example, if you hold the Ctrl key while using the Inflate brush, it will deflate the shape instead, creating a concave shape.
As you can see, my figure is getting a little grainy. So, we're going to remesh this model again and add more dots and therefore detail.
This time, we're putting the Voxel Size to .01m. Apply the remesh as before. Now we have more dots to work with and we're just repeating the process, smoothing, and sharpening the lines.
I was going to add a bit about how to take a photo of your sculpt, but I ran out of photo space. I will add a reblog with this information.
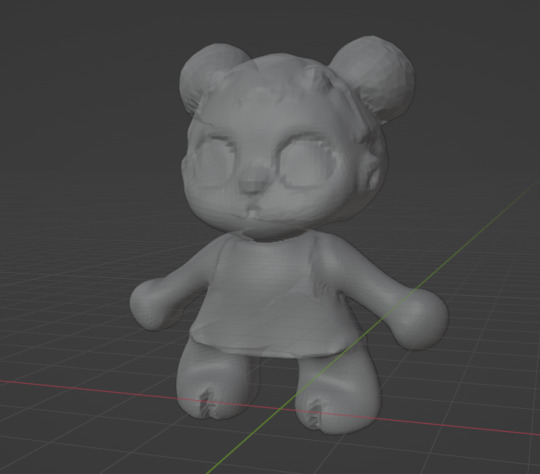
I came up with this little lamb character on the spot because the clay strips created a nice texture. She's by no means perfect, but she did turn out pretty cute so i might make a cleaner version later on.
64 notes
·
View notes
Note
hello! I was wondering how you make gifs because I can’t seem to find any good tutorials….
Hi! I'm glad you want to learn to make gifs, it's lots of fun to do and the world needs more gifmakers! This is the tutorial where I first learned; this is a tutorial where I learned again; this is one more tutorial I stumbled across after learning which looks as accurate and detailed as a tutorial can get.
I'm sorry I'm not making into a detailed tutorial– I would genuinely love to, but I don't have that kind of time in my hands right now and I don't think I would be adding much to what's already been explained in detail by the aforementioned tutorials. That said, I'm always happy to help, so please reach out through ask or dms if you have any other question!
As for my personal giffing process:
I use Potplayer ver. 211118 for frame capture. Generally, VLC is the best, safest media player, being open source and all; I know most gifmakers on Windows use that, and it's the one I would recommend. But I got so accustomed to Potplayer's interface and shortcuts, I can't let go of it even though I know VLC is the best option by far (╥﹏╥) If you download Potplayer, make sure to download it from the official website.
These are my frame capture settings; I usually capture frames with the video slowed down (I'm just meticulous and want to make sure every frame is included, but most of the time it's not really necessary and will make the gif heavier, so be careful with that). You can reduce playback speed with the X key, increase it with C, and set it to normal again with Z. (Other useful shortcuts are alt+H to turn on/off subtitles, ctrl+E for frame capture, alt+A to select audio track.) I usually capture every frame either at 0.2x or 0.5x speed.
Something I always do and really recommend is exporting gifs a first time before converting to smart object to check and correct the timing of the gif. I usually use a 0.04-0.05 delay with frame captures at a reduced speed rate of 0.2x and 0.06-0.08 with frame captures at a reduced speed rate of 0.5x.
These are the sharpening settings I use.
For colouring, I use curves (two different layers - one for the darkest pixel and the other for the lightest pixel - often set at varying in opacity), hue/saturation, brightness/contrast, and selective color.
Lessons I've learned:
Gif dimensions look like they don't make any difference; they do. Stick to the proportions.
The video size does influence your gifs' quality. In my opinion my latest Wan gifs looked much worse than my previous gifs because I switched to a lighter video files batch (that would be, ~200MB per episode), even though they were all still mkv. Try to download heavy files when you can (and never pick anything that isn't mkv).
#I hope this could be of any help!! Please do not hesitate to reach out if you have any question!!#people asks me stuff
15 notes
·
View notes
Text
“Blast From the Past” Login Event Begins on The Sims 4
A new login event has started on The Sims 4, as previously announced during the most recent Behind the Sims video. Blast from The Past celebrates The Sims 25th birthday with items from across The Sims, The Sims 2 and The Sims 3.
There is a new blog post with details on the prizes, a video tutorial, and an FAQ section. You can read it below.
Get ready for a free, limited-time Event where you'll need to venture into Live Mode to participate.
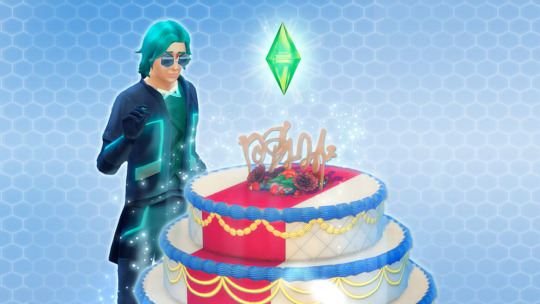
A mysterious figure has blasted into town and needs your help! Someone is “borrowing” from the past, and your help is needed to unravel the mystery through time! You'll be rewarded for your efforts throughout the Event, with one being the Surprise Birthday Cake. Hide inside and jump out to surprise and delight the gathered Sims with this delicious birthday treat!
How Does it Work?
Open Live Mode with an existing or new Household. After a short wait, A Strange Visitor will appear piquing your curiosity to investigate!
The Event will run for six weeks, with two exciting Quests each week. Your journey begins by discovering who the Strange Visitor is, and learning of the missing objects from the past! As the weeks progress, you’ll continue to dig deeper into the mysteries of time, attempt your own journey through it, and unravel the motives of the time thief! The more Quests you complete, the more Event Points and rewards you’ll earn.
Make sure you’re online. Log in to your EA account.
Enter Live Mode, and you’ll see the first pair of Quests, which start with a pop-up. In Live Mode, you can access the Event Screen by clicking on the Event Icon!
Earn Event Points by completing Quests and Goals. As you earn Event Points, you’ll be able to claim new rewards.
Claim your rewards through the Event Screen in the Main Menu or Live Mode by selecting Claim. Note: You must be in Live Mode to claim Consumable Rewards.
Claimed rewards will be available in Build Mode, Create a Sim, or your Sim’s Inventory. You can filter to view Event rewards with the Event Rewards filter under the Special category in both Create a Sim and Build Mode. For more help with claiming rewards, check out our EA Help article.
Each week, two new Quests will be available. Complete these Quests to earn more Event Points and unlock new rewards!
The Blast from the Past Event will have four weeks of Quests and two extra weeks at the end, so there’s plenty of time to catch up and complete it!
youtube
Claim the Blast from the Past Rewards to create a futuristic-inspired Sim who loves to lounge in their inflatable couch, or toss on Dina Caliente’s iconic little black dress and hit the light-up dance floor while listening to some retro classics! Rest assured, your claimed rewards are stored on your EA account, so you do not need to worry about losing them.

Week 1
Relax in your Fun-Fun Inflatable chair! Sport your new Future’s So Bright Sun Glasses while admiring your Retro Deco Phone Set.
Retro Deco Phone Set
Relevart Time Walkers
The Yesterday Set floor tiles
The Future's So Bright "Sun" Glasses
The Fun-Fun Inflatable Set, Part One
Week 2
Wake up on time with the functional Get Up! Alarm Clock, put on your Emit inspired outfit and Bow Tie while preparing a feast at the Bigger Gatherings Banquet table.
Get Up! Alarm Clock
Be "The Emit" full body outfit
Bigger Gatherings Banquet
The Relevart Neck Stabilizer bow tie
Week 3
Make time for an iconic look by getting dolled up in the Dina Caliente LBD (Little Black Dress) while listening to some New Retro Station Songs or get comfy on your Fun-Fun Inflatable couch, while you contemplate your next “grab” for the Sticky Fingers aspiration.
The Fun-Fun Inflatable Set, Part Two
Dina Caliente's LBD
New Retro Station Songs
Sticky Fingers aspiration
Week 4
Make sure to celebrate with the Surprise Birthday Cake, and jump out to share the fun! While in a party spirit, don’t forget to get out on The ElectroDance Floor to dance the night away!
Surprise Birthday Cake
The ElectroDance Floor
FAQ
Do I need to log in to my EA account?
A: Yes, by logging into your EA account, you save your Event progress and the rewards you earn from this Event to the account. That way, if you ever need to install The Sims 4 again, you simply need to log back in to gain access to your rewards!
What about SDX releases, I thought those were provided free content and updates!
A: Sims Delivery Express drops aren’t going away, but we're always looking for new and novel ways to deliver gameplay, as well as objects and clothing to add to your Sims' lives. You can still expect SDX releases throughout the year as well as new Events to engage with The Sims 4 throughout the seasons.
What if I log in and don’t see the Event?
A: The Event starts on 2/04 at 9 a.m. PST and ends on 3/18. Please make sure you are online and logged into your EA Account. If you still do not see it, you may need to restart The Sims 4 or disable any UI mods you have installed.
The Blast from the Past Event will be available to players until 3/18. While no new quests will be added after 3/04, players can still complete quests and claim any event rewards that they've earned but not yet claimed from the Event Screen. Rewards must be claimed by 3/18 or be lost.
Will this be available to Everyone?
A: Yes! The Blast from the Past Event will be available to everyone starting February 4th, and you won’t need any Packs to participate.
What are Event Points?
A: Event Points are a limited-time measurement for the Blast from the Past Event that allows you to claim free rewards. As you earn Event Points, you progress along an experience track and can claim rewards along the way.
How do I earn Event Points?
A: Each Objective in a Quest gives Event Points. Mousing over the Quest will have a tooltip telling you how many points you will earn. Completing the entire Quest nets additional Event Points. Once you have enough, you can claim rewards.
Do I have to spend Event Points?
A: Your Event Points are a cumulative total. When you claim a reward, you still stay at the same Event Point total, so your Event Points aren’t actually “spent.”
What happens if I have leftover Event Points?
A: The Blast from the Past event offers a finite number of rewards. If you claim them all and still have Event Points, don’t worry! Your Event Points cannot be used for anything other than the Blast from the Past Event and will expire when the Event is over.
Can I still complete the Event if I start late?
A: Yes, the event will run for 6 weeks. If you start late, you will have access to all the previous week’s Quests.
13 notes
·
View notes
Text
Short Short Very Short Version of Newcomers' Thoughts
Forgot to add my very important and objectively correct opinions about Newcomers’ which is…
First play being a fairytale is very highschool coded. It’s sweet and simple and the dance is cutesy. It’s a good start!
Speaking of highschool Otori during improvisation gives me second-hand embarrassment now cuz it reminds me of my own teen days. Who among us hasn’t done things we thought were soooooo cool and soooooo smart that turned out to uh…not be.
What’s really great about this game is that we get to see both rehearsals and the final result and can compare the two. You get to hear actors explore their roles and go through growing pains. Suzu is the biggest example, you could see how he slowly understood his role through not only his voice but his posture as well. It makes it really difficult to play without the voices.
Another interesting bit is that because you see the rehearsals you’re able to hear lines that are cut from the final product, either intentionally or by mistake (coughOtoricough)
Also Otori is my second son because I have a soft spot for bratty characters. But there’s even brattier characters in the game later and you can probably guess how I feel about them.
Midori Tancho is the best teacher he’s got his own fanfare and everything! I love when his fanfare announces his presence before we even see him sometimes.
I completely ignored the rhythm game tutorials first time so I didn’t realize that we’d actually SEE them dance during the rhythm game until the play started. Needless to say I absolutely LOST IT!!!
Apricots apricots apricots apricots apricots apricots apricots apricots apricots apricots apricots apricots apricots apricots apricots apricots apricots apricots apricots apricots apricots apricots apricots apricots apricots apricots apricots apricots apricots apricots apricots apricots apricots apricots apricots apricots apric-
Feel free to share your thoughts on the newcomers’ season! What was your first impression of these theater kids? Who did you go for? Did you miss the tutorial like I did and was left completely unprepared? Do you like a p r i c o t s ?
10 notes
·
View notes